Here is a helpful tip for users of Looker Studio (formerly known as Data Studio). You can easily add social share buttons to your dashboard templates, encouraging others to share your work on social media, which can help increase your business's visibility and reach.
If you are an agency or an analytics educator, and you create Looker Studio dashboard templates as a way to showcase your work or generate lead magnets for your business, as well as to enhance your brand's presence among potential clients or your target audience, it's strategic to consider integrating social sharing capabilities into your organization's Looker Studio templates for your next public project.

This notion prompted me to delve into the process of adding a social share button to your Looker Studio reports, which is the primary focus of this blog post. You will also learn how to incorporate WhatsApp and email click-to-contact buttons, which makes it easy for prospects to contact right from the dashboard.
It's important to note that the Social Share button is not a built-in function in Looker Studio. However, you'll get the opportunity to learn in detailed steps how to create and customize your social share button that will perfectly match your brand in under eight minutes. Let's get started!
Dashboard Virality and the Role of Social Share Buttons:
It's crucial to recognize that building a Looker Studio report template that garners acceptance among your target users and usage by your prospects involves many factors. Social share buttons only serve as essential features that simplify sharing for your audience once you've crafted a valuable resource capable of answering their pressing business, optimization, or marketing questions.
The act of sharing is where your business and its visualization project gain increased brand visibility, generate leads, and potentially augment your client base and revenue.
Incorporating a social share button into your Looker Studio visualization templates can benefit your business in several ways, such as:
- Enhanced visibility and expanded reach to your business prospects
- The potential of your work or brand going viral
- Lead generation with the possibility of acquiring more revenue
- Social trust and enabling brand advocacy
- Quality insights of your report social share behavior, when the right measurement strategy is activated to measure the social share button performance
It's essential to remember that adding a social share button doesn't guarantee instant virality; it still comes down to the usefulness of the dashboard you've created.
How to Add Social Share Buttons to Your Looker Studio Report:
To add a social share button to your Looker Studio template, you'll first access your preferred dashboard where you intend to incorporate this feature.
The subsequent step involves the creation of a button, and we'll initiate this process by creating a simple button using the following Looker Studio elements:
- Text
- Rectangular Shape
- Image (Icon and Overlay)
Begin by selecting the “rectangle” shape.
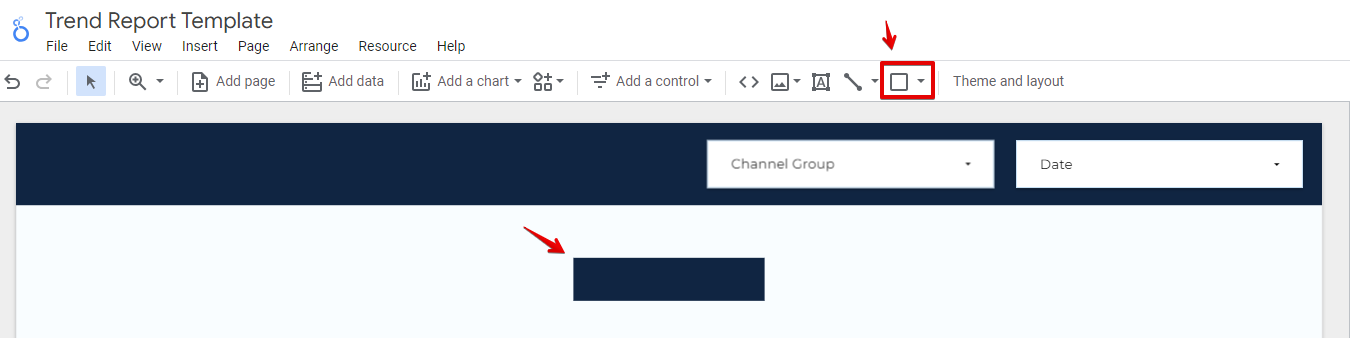
For the sake of this blog post, my background colour preference will be white, and you can configure this by selecting the rectangular shape and adjusting the colour in the background settings.
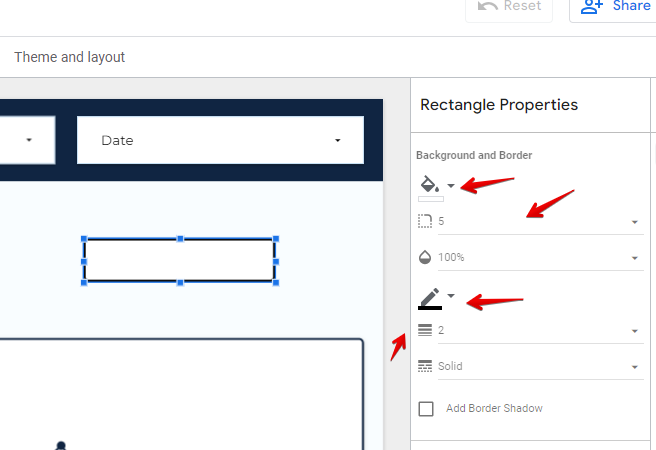
For illustrative purposes, I'll assign the rectangle a border radius of “5” and a border line width of “2” with black colour.
Next, add a textbox element, and within the textbox field, input “Share on Facebook.” Modify the font colour to white by adjusting it within the “Font and Paragraph” section. Please feel free to select a font, size, and style that aligns with your branding guidelines. However, for the sake of simplicity in this demonstration, I'll employ the “Montserrat Font” with a black colour.

Position the newly created text box atop the rectangle. Subsequently, incorporate a Meta/Facebook PNG Logo image icon. You can source this icon from platforms like Flaticon or do a simple Google search.

Note: If the PNG image you imported/dragged into the report comes with a background colour, you can rectify this by setting the image's background colour to transparency.
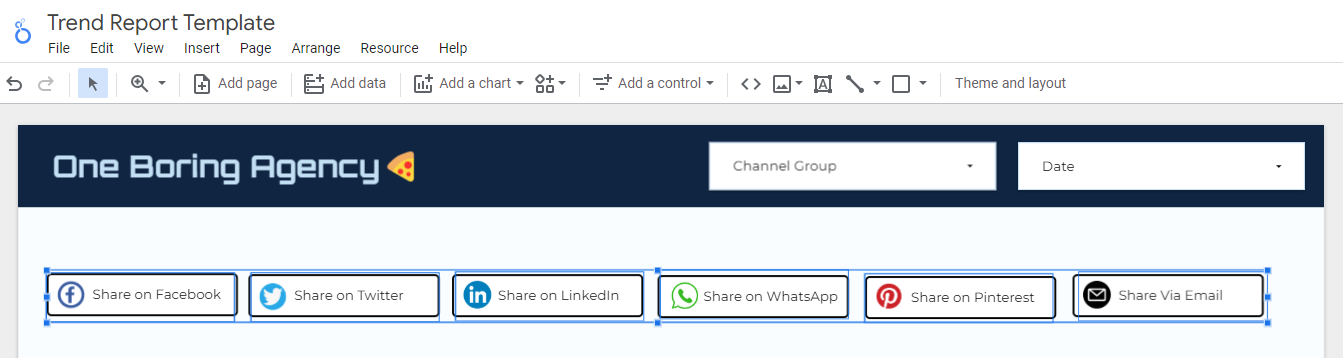
Now, let's replicate the button elements we've created for the following social media platforms:
- X (formerly known as Twitter)
- Email Share
- WhatsApp Share
Modify the text and image icons to align with their respective social media platforms.

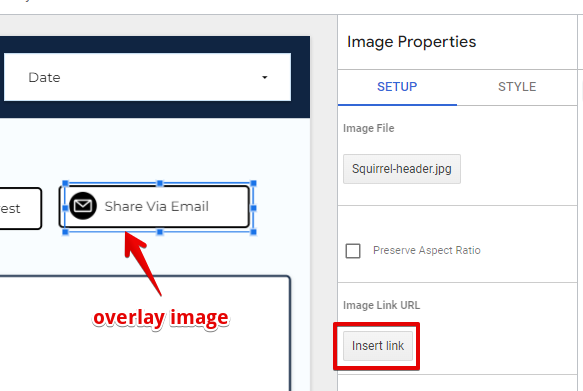
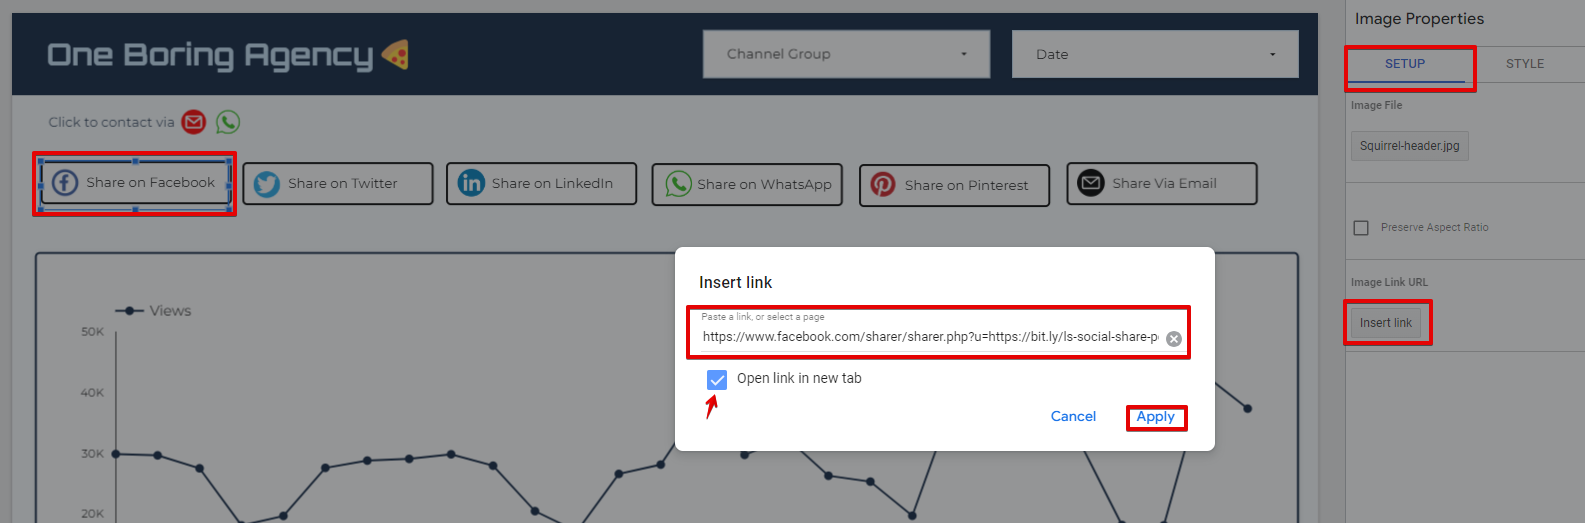
Proceed by converting our social share button creations into clickable links. We can achieve this by adding an image overlay with an opacity of 0%. Ensure that this image overlay covers the entire button you've designed.
You should also uncheck the “Preserve Aspect Ratio” configuration, which allows you to resize the image to fit with your button size.
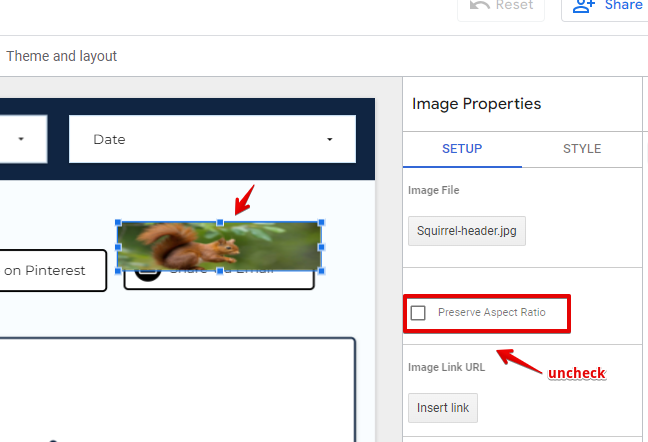
You can adjust the opacity by selecting the image overlay, navigating to the “Style” options, and modifying the opacity from “100%” to “0%.”

It should appear transparent, as shown below.
The subsequent step entails generating the social share links we will add to each button.
Generating Social Media Share Links:
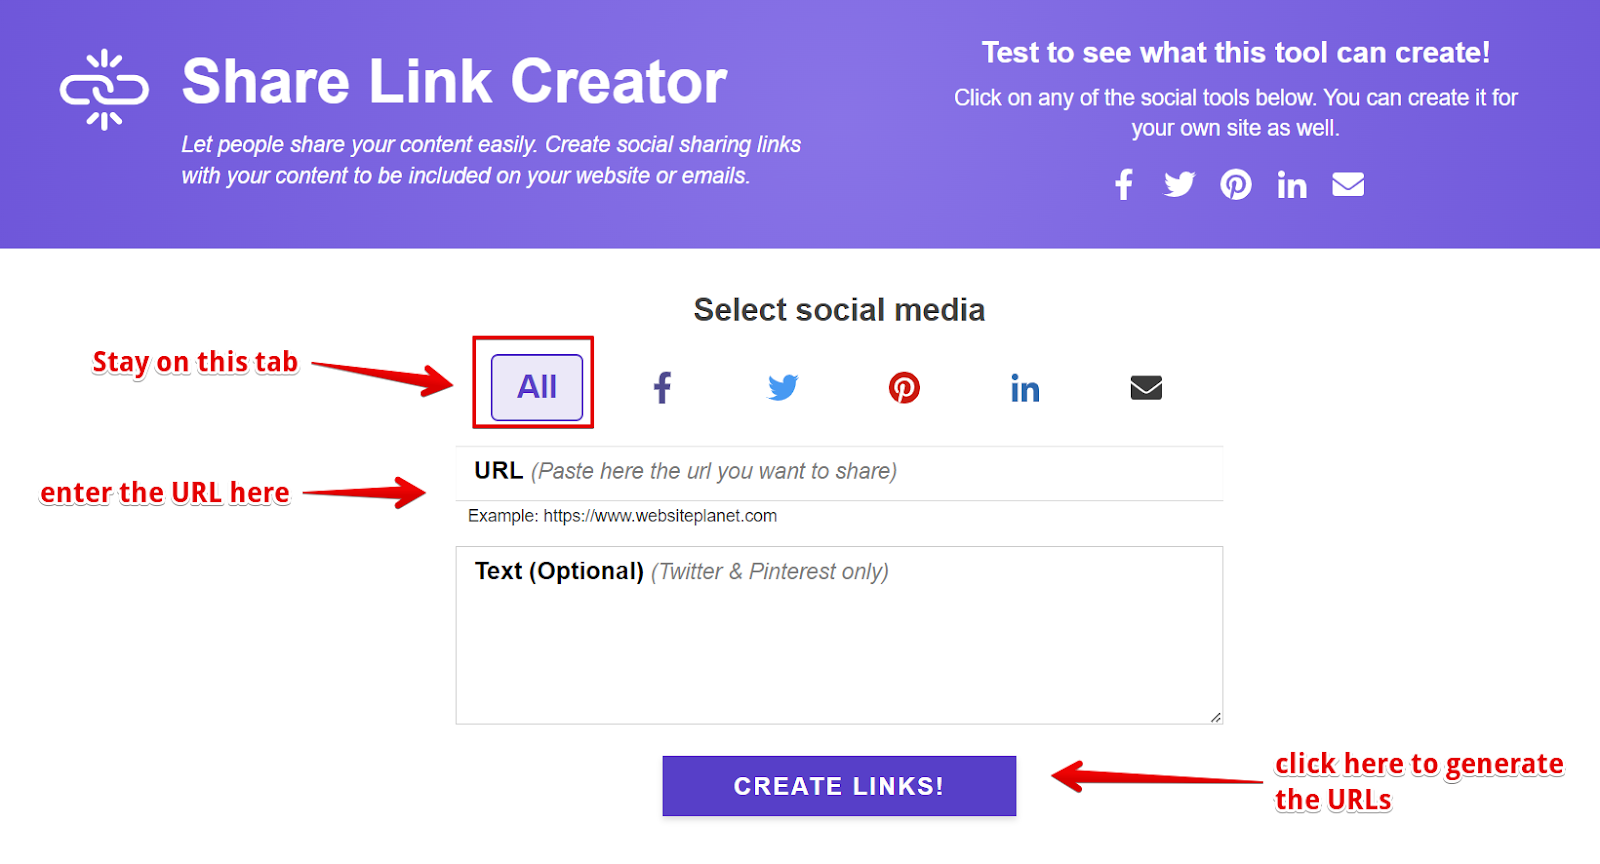
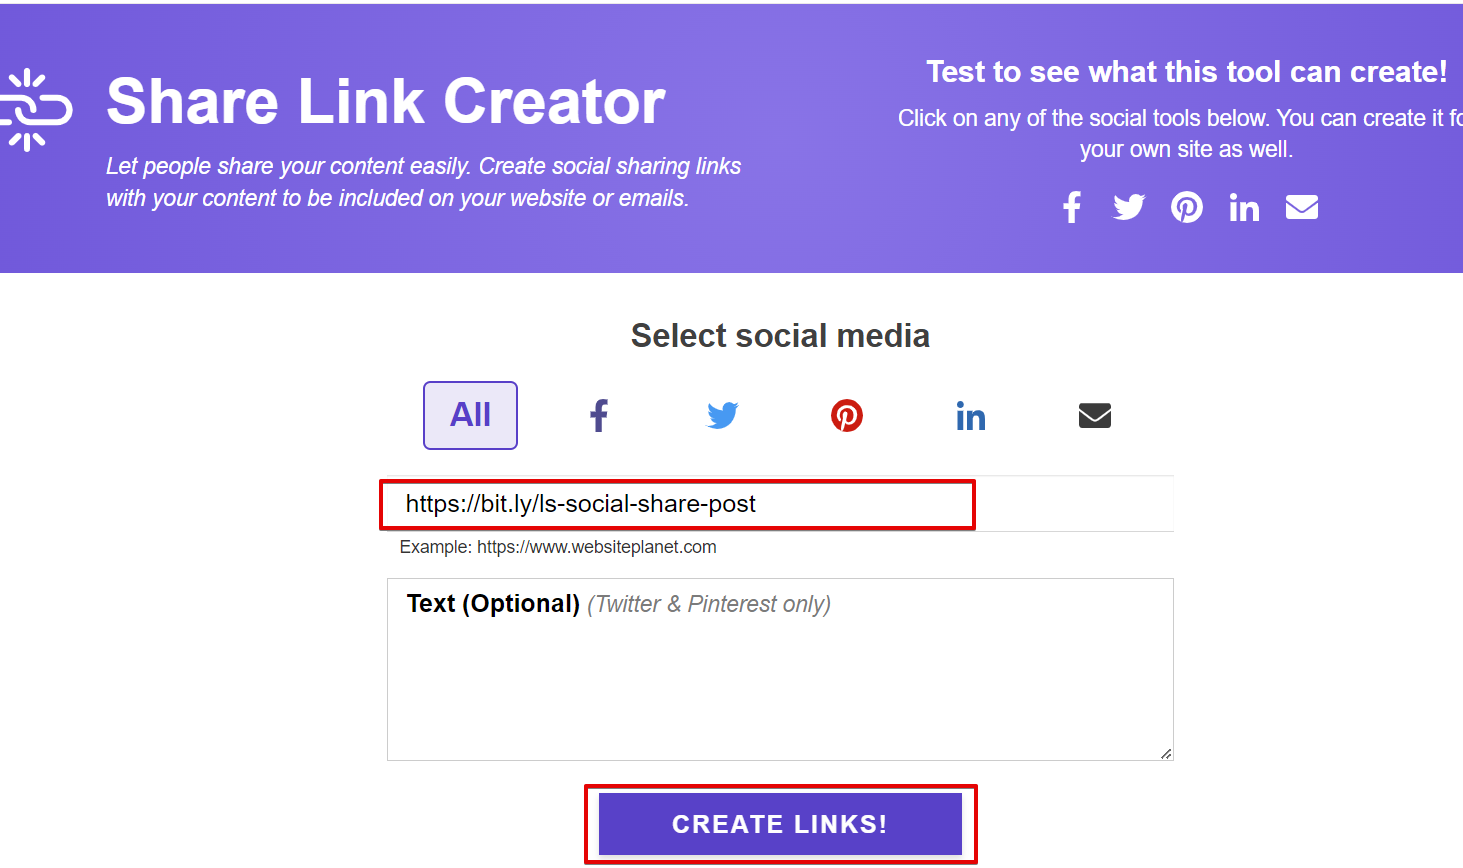
To create the necessary share links, you can either conduct a Google search for a “Social Media Share Link Generator” or visit the social media link generator tool provided by “Website Planet.”
Within the “Website Planet” link generator tool, you'll have to input the link to your dashboard or the landing page, where users can sign up to access the dashboard or make a copy.
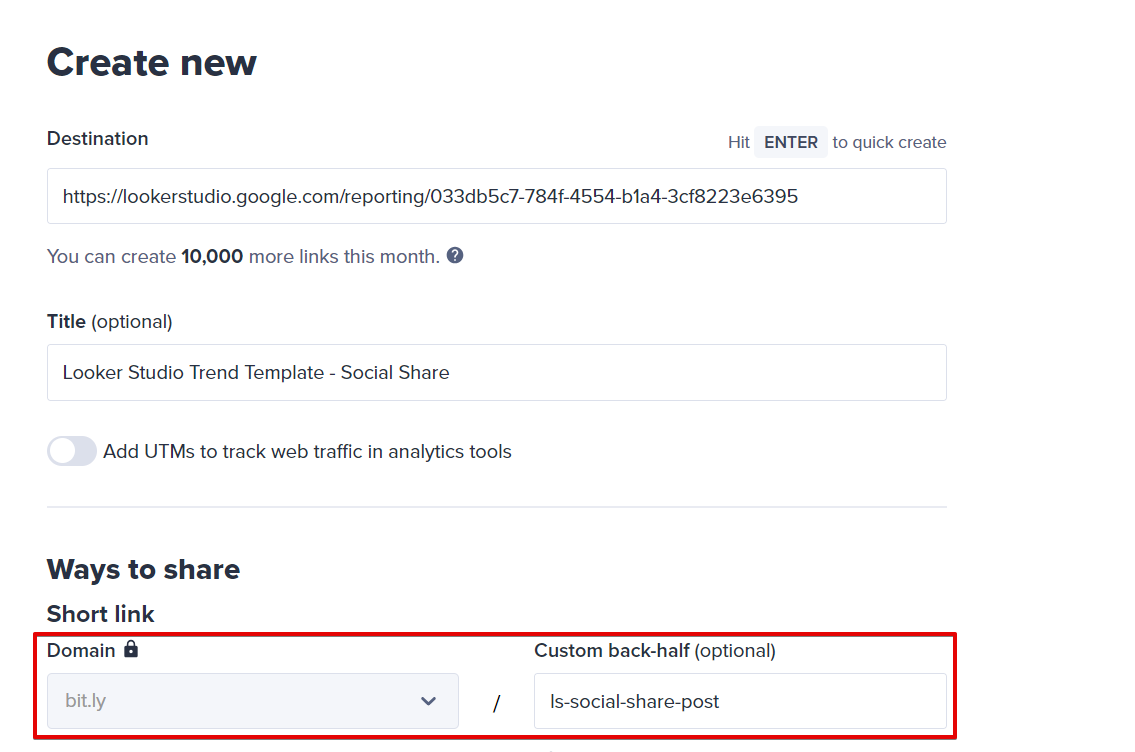
A helpful tip is to ensure that the URL is UTM-tagged, and you can use a link shortener to make things cleaner when using the Looker Studio dashboard URL or the UTM-tagged dashboard landing page URL.
In the example below, Bitly was used to shorten the Looker Studio dashboard URL.
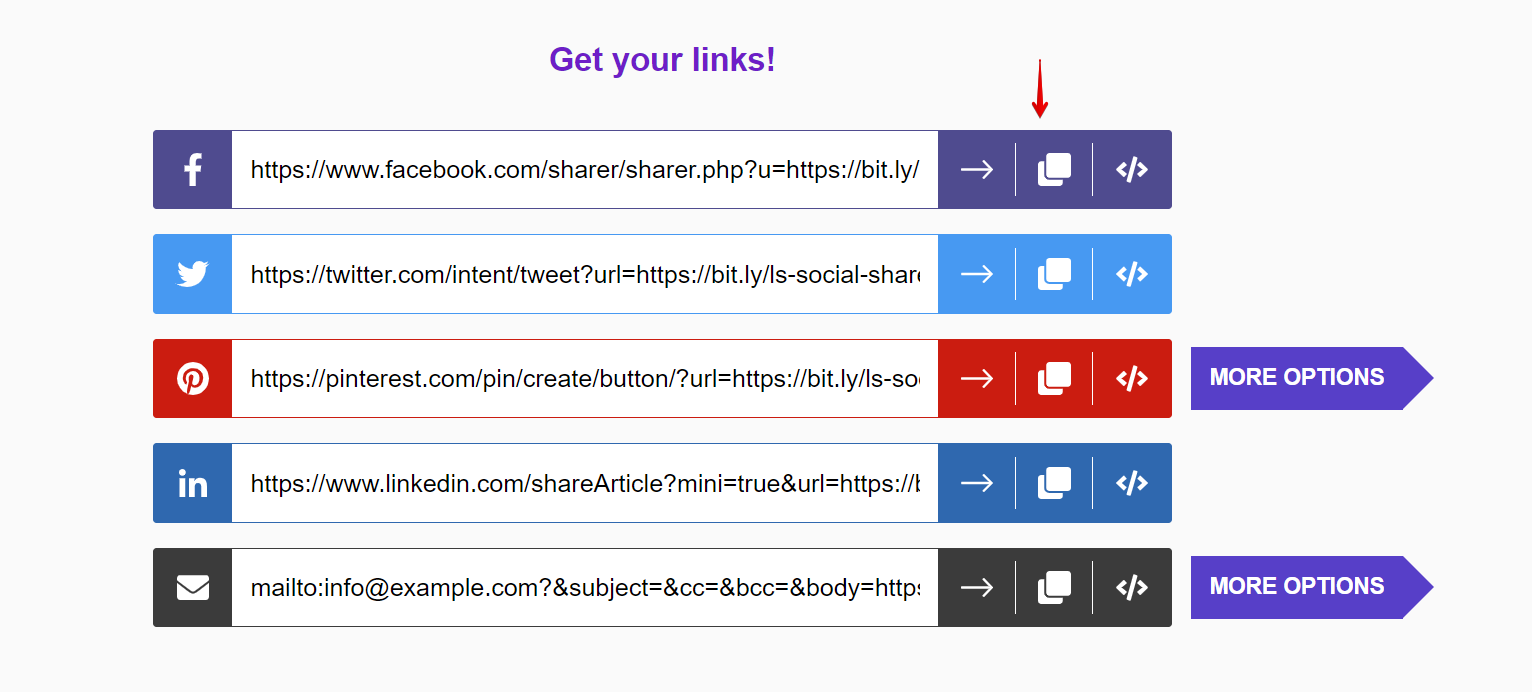
Ensure you're on the “All” tab and enter the URL. After adding the dashboard URL or the UTM-tagged dashboard landing page URL, scroll down to find the generated URL for various social platforms. Please note that you should copy the link and not the HTML code; you can do this by clicking the copy button.
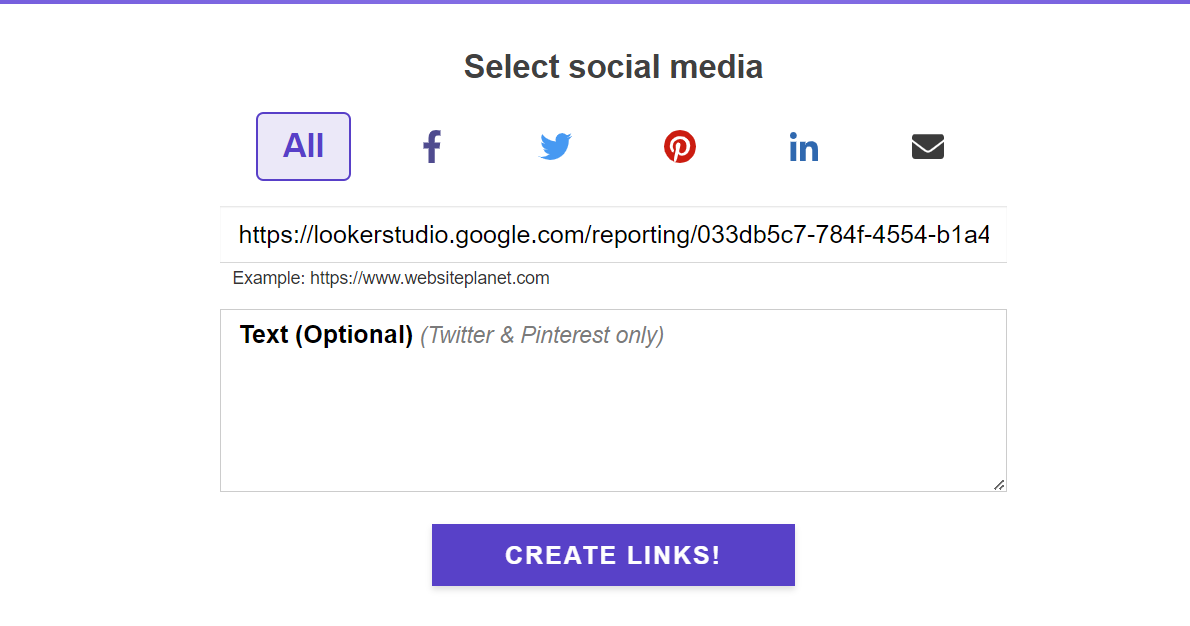
Here is an example where a shortened URL is used.
Now, proceed to Looker Studio and add each link to its respective social share button within your Looker Studio dashboard (except for email & WhatsApp). Another valuable tip is configuring the button to open the link in a new tab.
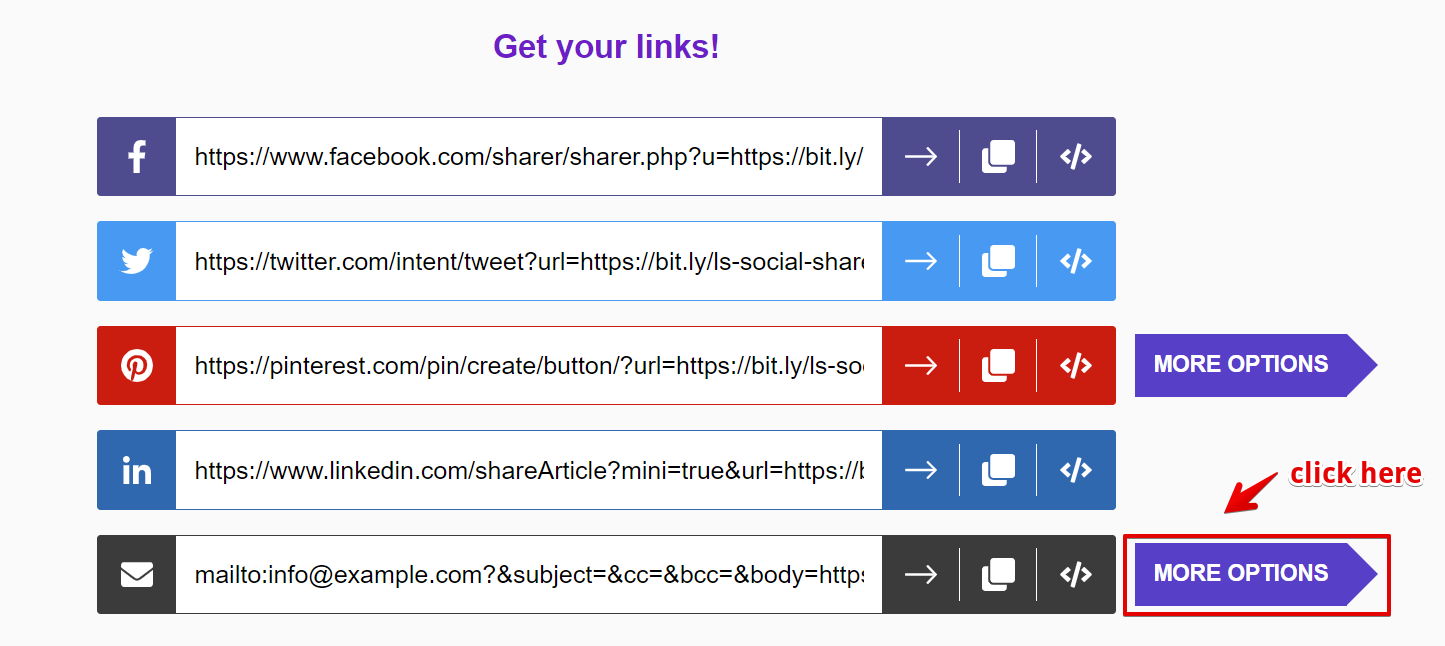
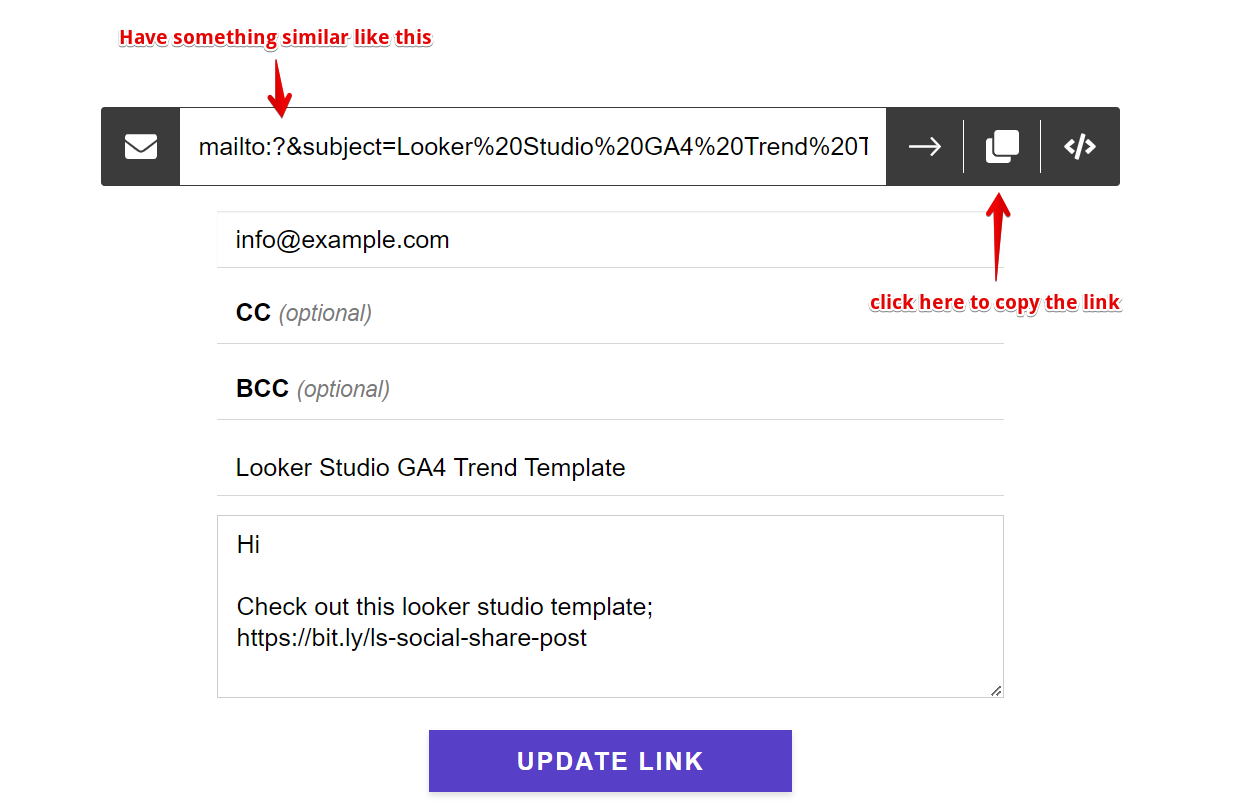
You'll need to modify the generated email social share link before use. To do this, you can either copy the email link to a notepad and edit it there or make the changes directly within the “Website Planet” social share link generator tool. Click the “more options” button in the “email” section.
Next, add a subject title and a custom email body (ensure the dashboard URL or UTM-tagged landing page URL gets included in the email body), after which you'll click the “Update Link” button.

In the same screen, remove the email address placeholder by clicking on the link field to delete only the email address.
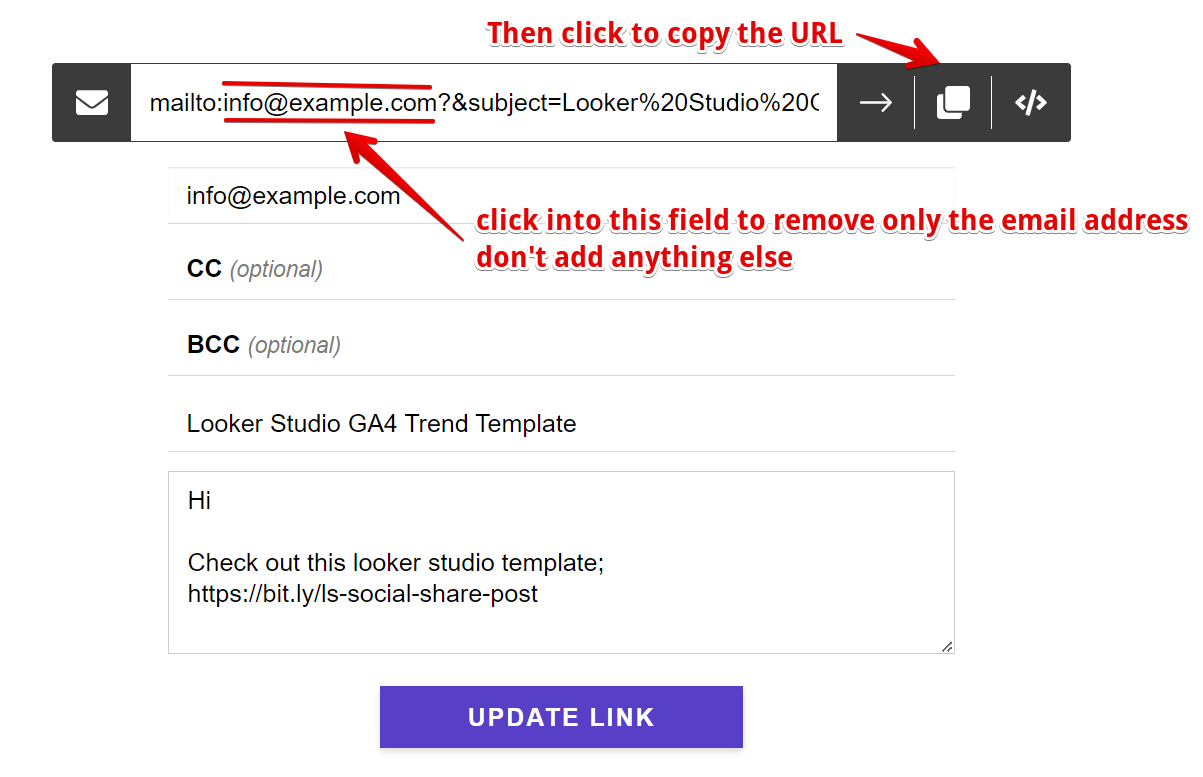
Now, you can copy the email share link and add it to the email share button that you've created.
Alternatively, if you prefer using Notepad to modify the email link you copied earlier, remove the email address from the link and add your title after the “subject” query key in encoded format. The same applies to any content you add after the “body” query key.
For WhatsApp sharing, replace the “https://example.com/” full URL in the provided link with your dashboard URL or UTM-tagged dashboard landing page. You can add text before the link, but ensure it's in encoded format.
https://api.whatsapp.com/send?phone=&text=https://example.com/

You should then have a WhatsApp social share URL like the one below if you used the Looker Studio URL as your destination URL.
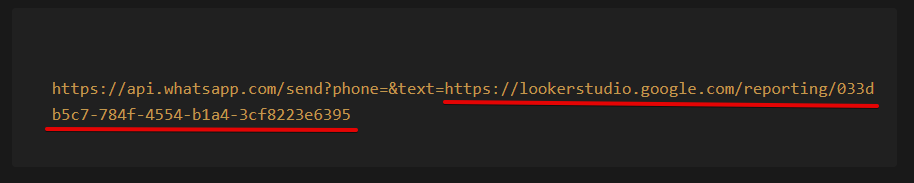
In instances where you’ve shortened the URL, it’s pretty much the same, just that it’s cleaner, as seen in the image below.

You should add each generated social share link to their respective buttons and ensure the link is configured to open in a new tab when clicked.
Adding Click-to-Contact Buttons to Your Looker Studio Report:
To create contact buttons, follow the same steps as social share buttons, with the only differences being text, logos, and link generation.
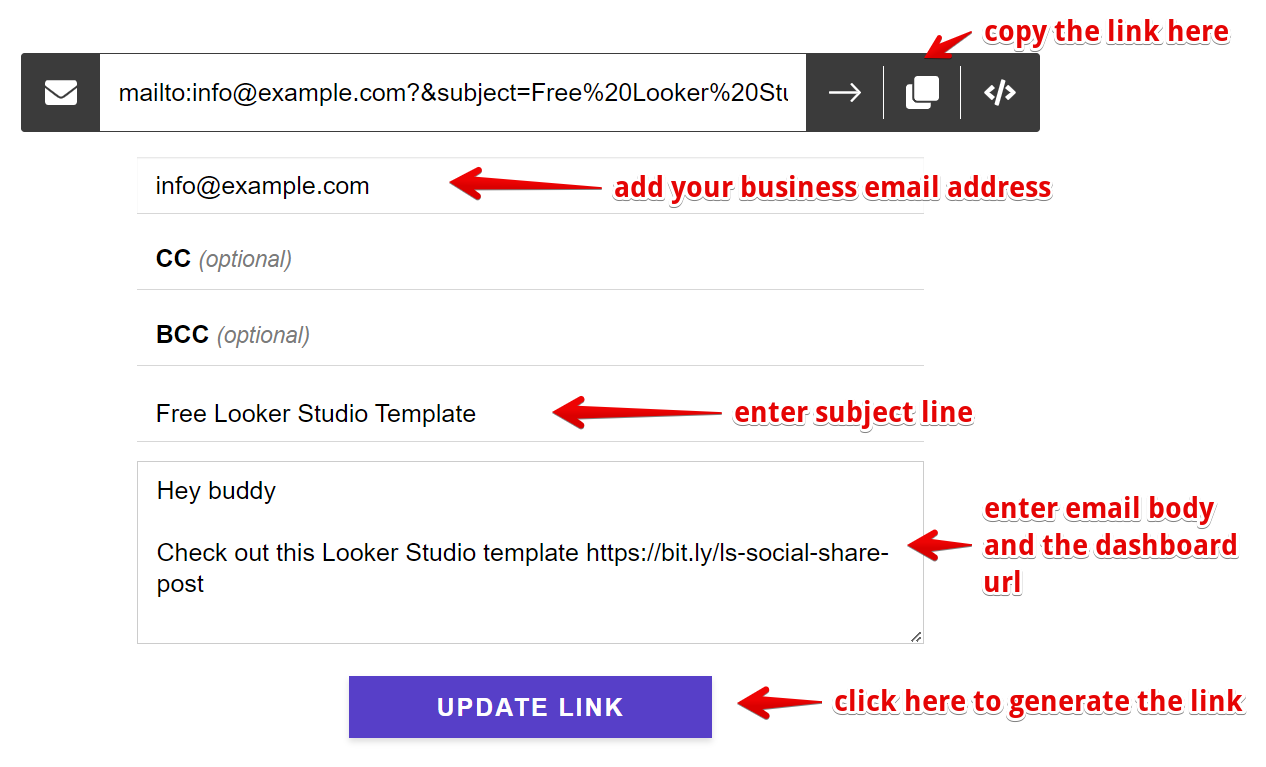
You can use the “Website Planet” social share link generator for the link. Add your email address, including your preferred subject line, and either an email body or just your URL as the body. Click “Update Link,” then copy and add the link to your dashboard.
Regarding WhatsApp, if your business communicates with its target audience through WhatsApp or you're a freelancer open to prospects reaching out via WhatsApp, you can utilize the “Postcron WhatsApp Link Generator Tool” or search for a “WhatsApp Message Link Generator Tool” on Google.

In the tool, input your phone number and the desired message with your link. Afterwards, click “Get Link” and “Copy Link” to add it to the button you've created in the Looker Studio dashboard.

You should add each click-to-contact generated link for email and WhatsApp like we did for the social share buttons.

Closing Remarks:
As we conclude, let's take a moment to reflect on our journey. We've explored the significant impact of adding a social share button to our dashboard template and its role in a business's virality, brand visibility and lead generation.
For a more in-depth understanding, consider implementing distinct tagged URLs. These help identify in detail how the traffic originates from the dashboard template's social share button and pinpoint the specific social media platform responsible for the share. This insight can guide you in adjusting or deciding which social media platform's share button should be retained or removed from the dashboard.
It's crucial to note that social sharing won't guarantee instant stardom for your dashboard. Various elements come into play when determining whether your dashboard is worth sharing.
Throughout this article, we've covered the creation of social share and contact buttons. We've also delved into generating social share links, although it's worth mentioning that you can create links for social platforms not discussed in this article.
The choice depends on your target audience's preferences and your objectives. For example, you add your URL after the “URL” query key for Telegram, as demonstrated below.
https://t.me/share/url?url=https%3A//example.com/&text=
I encourage you to unleash your inner creativity to customize your social share button, making it eye-catching, artistically designed, and aligned with your dashboard's branding guidelines.
The methodology we've shared here also applies to report templates you've built in Power BI, Google Sheets, etc. It all comes down to your role as the analyst and the depth of your innovative thinking.
You can explore the dashboard template mentioned in this article to play with the social share and click-to-contact buttons.
With that said, we've reached the end of today's tip, where we've learned how to incorporate a social share button into our Looker Studio dashboard template. Until next time, happy measuring!
About the Author
Jude Nwachukwu is an analytics specialist working with businesses across diverse industries in Africa, Europe, and North America. His passion for writing and assisting non-technical marketers to thrive in the ever-evolving realm of analytics gives him great satisfaction. He co-founded a measurement resource hub called DumbData.